Astronomy
Background: My brother had a 4 1/4" reflector telescope back in the early 60s, and although I looked through it once or twice, I didn't have a great deal of interest at that time. In 1965 I was working for NASA in Houston and one of the Engineers loaned me his high-power binoculars. I got up early the next morning to take a look at Jupiter. I mounted the binoculars to a chair, and after some adjustment got them aimed at the giant planet. This was the first time I had seen this massive sphere and four of it's moons lined up in a row.
Grind my own Mirror? I was so impressed, that the next day I ordered a 10" mirror-grinding kit from Edmonds Scientific. Everyone said I should start smaller, but I went for the big guy. The kit came with a thick Pyrex mirror blank, and a thin plate glass tool which was also 10" in diameter. The kit also had the grinding compounds and a "pitch" used for the polishing stage. I cut and wedged a 12" wide piece of 3/4" thick wood between the lips of a 50 gallon drum, and then added three clits around the glass tool to hold it in place. I was ready to go !
Let's get Grinding ! Working only in the evening after work, amazingly it only took about a week to hog out the glass to the appropriate depth using #80 carborundum. For all steps of grinding and polishing, the compounds are sprinkled on the glass tool, and water is then added using a squirt bottle. The 10" diameter Pyrex blank is rubbed against the plate glass tool while walking around a 50-gallon drum. One would take a few stokes, then take a step in one direction, and turn the mirror blank in the opposite direction, then repeat the stroke. The whole idea is randomness, in fact a person can do a better job than a machine since a persons' grinding is more random. The "roughing" procedure starts with a straight stoke keeping the center of the mirror over the edge of the plate glass tool. As the grinding proceeds, you slowly move the mirror in towards the center of the tool. With a straight edge placed across the mirror surface, you will see the center of the mirror developing a "hole" and as you continue grinding and moving in towards the center, the hole will get bigger in diameter. The depth of the hole can be measured using the straight edge & feeler gauges, and a simple calculation will allow you to estimate the focal length. If your first estimate shows the focal length too long, this tells you to spend more time on the edge before moving in towards the center. Once you reach the center, you switch to a "W" stoke, and the straight edge will soon show a complete spherical surface across the whole diameter of the mirror.
Spherical or Parabolic? Gathering all of the light from a curved mirror into a single point requires a parabolic surface. I determined, however, that if I made a long enough focal length of f/9 or greater, then the surface would be accurate enough to be left spherical and eliminate the need for a more difficult parabolic surface. In the rest of the grinding procedure, the "W" stoke is used, with the mirror blank normally on top of the plate glass tool. As grinding proceeds, measurements might indicated too short of a focal length. In this case, the two pieces of glass can be reversed. With the tool on top, the tendency is to flatten the edges of the mirror which results in an increasing in focal length.
Grinding Away: I went through 5 more grit sizes of grinding compound, one size each evening. I figured by only doing one grit at a time, this would eliminate the possibility of contamination during the grinding process. Finally I finished all of the grinding, and it took almost another week to polish the surface to a luster.
It's Polishing Time: The polishing process involves using a special lap made by pouring heated pitch (about the consistency of molasses) onto the plate glass grinding tool. The tool is first wrapped with making tape to form a dam. A flat sheet of rubber material about 1/8" thick with square or round cut outs (called a "channeling mat") is pressed into the hot pitch to form channels. The mirror is then placed on top to form the pitch to the mirror surface. After giving time for the lap to form to the mirror, fine cerium oxide or rouge is poured on the lap, and the mirror is polished using the standard "W" stroke.
Mirror Done...What Now? Now that the mirror was complete, I purchased a 12" diameter rug tube, covered it with white plastic self-sticking shelving paper, and drilled holes in the tube for mounting the eyepiece holder and the 10" primary mirror. A small diagonal mirror was required to direct the light beam out of the tube to the eyepiece. The diagonal holder was an integral part of the eyepiece holder provided with the kit. I wanted to take a look before sending the mirror off to be aluminum coated. Without any coating, the only thing bright enough was the moon, and it looked great. The brightness was about right just reflecting off the uncoated polished surface. This telescope produced many hours of fine viewing, but later I turned the mirror over and again walked around the barrow until I had an f/7 surface. This required a parabolic surface, but I got the job done. It required longer "W" stokes in the polishing stage, and a lot of measuring. I always wanted to have both sides aluminum coated and have a flip-over f7/f9 telescope. I have never seen or heard of anyone ever doing this, so I thought it would be a unique challenged.
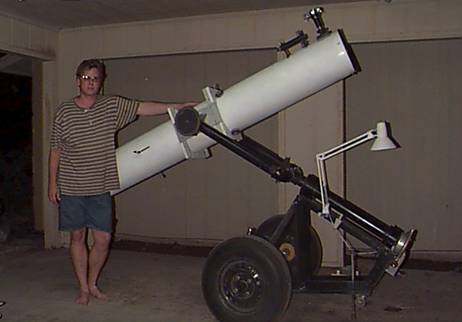
Pictures: Following is a pictures of the 10" Newtonian mounted telescope with the mirror I ground. My son Mark has now inherited it and he has done a great job of rebuilding and enhancing the mounting. He inherited it after I purchased a 17 1/2" mirror from Coulter Optics in 1996. Coulter Optics informed me it would be close to a year before they could deliver, but I went ahead and placed the order. Only a month or two after receiving the mirror, Coulter Optics declared bankruptcy. That was a close one ! My 17 1/2" Home Built Dobsonian is shown in the second photo.
10" Newtonian Mounted Telescope
Specifications
Mirror = 10" diameter
2-1/2" thick Pyrex Mirror
Focal Length = 70" and 90"
f/7 on one side, f/9 on the other
Mirror tested to be 1/16th wavelength
My 17 1/2" Dobsonian
